Showing posts with label Whole Wheat. Show all posts

Sunday, July 10, 2011

Sunday Morning Pancakes


Delicious oat/whole-grain pancakes on a Sunday morning, how perfect!  I even busted out the whip cream and asked Ben to run downstairs and pick a few fresh strawberries.  Yup, I sure do have illegally planted strawberries in front of my assigned parking space.  Everytime I see the maintenance people pulling weeds, I run outside to make sure they don't pull them out.  Last time they were here, Ben said they were picking and eating my strawberries while weeding! 

As you may know, Vicki and I are cooking through the book, Whole Grains Every Day Every Way by Lorna Sass.  She actually found out we created this website and emailed us about a year ago.  Lorna gave us permission to post three of her original recipes.  Since her pancakes turned out AMAZING, I decided this is a must post for everyone to try.  Vicki and I have been very pleased with her book and hope that you enjoy this recipe.

Stop yourself from purchasing Bisquick or Aunt Jemima instant "just add water mix".  You should already have the ingredients listed below in your pantry.  Lorna suggests you make a large batch and store.  This is exactly what I did.

Dry Mix
1/2 cup old-fashioned rolled oats
3 1/4 cups whole - wheat pastry flour (100% ground wheat worked just fine)
1/4 cup sugar
4 teaspoons baking powder
2 teaspoons baking soda
2 teaspoons salt

Place oats in a spice grinder, processor, or Magic Bullet and process to the consistency of flour. Mix all dry ingedients together.  Place 1 1/3 cups of the mix into each of the 4 Ziplock bags.  Refrigerate or freeze for up to 3 months.

Whole Grain Pancakes
2 large eggs
1 1/4 cup of well-shaken buttermilk, plus more if needed. 
(If you do not have buttermilk use regular milk and add 1 tsp of vinegar)
2 tablespoons butter, melted
1/2 teaspoon vanilla extract
1 packet (1 1/3 cups) Whole-Grain Pancake Mix (see recipe above)

In a large bowl, lightly beat the eggs.  Blend in the buttermilk, butter, and vanilla.  Add the pancake mix, and stir just until the mixture forms a lumpy batter.  Avoid overmixing.  Heat griddle over medium heat and coat lightly with oil. Make pancakes!!!!  - amy w.

Monday, June 6, 2011

Toasted Almond Crackers & Hummus

I'm addicted to making crackers and storing them in a large mason jar. When I get home from a trail run, bike ride, or work, I'm starving and need an instant snack.  Instead of digging a spoon into a bowl of homemade chocolate ice cream or a eating a spoonful of peanut butter covered in chocolate chips (yes, it still can happen), I stretch my hand into the half gallon mason jar that sits on my counter full of fresh crackers.   I dip the crunchy crackers into homemade hummus and it hits the spot. 


If you are looking for a simple fast cracker, I posted this recipe several months back - Thin Wheat Crackers .  If you need a cracker with a hint of sugar, try my recent favorite - Toasted Almond Crackers.  Amy Pennington is an amazing author, gardener, and cook.  We have her book, Urban Pantry listed under our "book tab" so be sure to check it out.  Her recipes are simple and pantry friendly.

Now, for the homemade hummus.  I've adapted this recipe from The Vegan's Cook Bible.  I often double the recipe so I have even more to freeze in small containers.

  
Roasted Vegetable Hummus
4 cloves, garlic
2 onions, quartered
3 carrots, cut into 1 inch pieces
1 red bell pepper, quartered
Olive oil
1 can chickpeas
2 tbsp lemon juice
2 tbsp Peanut Sauce or Tahini
1 tsp ground cinnamon
dash sea salt
1/4 cup of apple juice (add before processing)
1/2 tsp honey

On a baking sheet lined with foil, combine all the veggies, drizzle olive oil over and toss well to coat.  Roast in a preheated oven at 400 degrees for 40 minutes or until soft and browned.  It's ok if the edges of your veggies are slightly burnt and crisp.  Let cool.

Combine veggies, 2 tablespoons of olive oil and additional ingredients.  Blend until smooth.

Transfer into smaller containers and freeze.  Enjoy!  - amy w.

Tuesday, April 5, 2011

Bread Prices on the Rise

I can't complain about gas prices since I commute 3 miles to work.  If traffic lights are working in my favor, I can leave 10 minutes before works starts and stroll into the office with plenty of time. However, it looks like gas prices are really beginning to effect food prices, so, the Whipple household is taking action one step at a time!  Several weeks ago, I told Ben that bread making will now be on the weekend chore list....well, my chore list! I think his list may be a bit longer than mine already, so I'm OK with adding one.  It's been 3 weeks now and there is no going back!
This week, I encourage you to bust out your bread machine and put it to work.  Back in 2001, during my college years, my mom thought it would be a genius idea to buy me a bread maker.  It sat on the shelf.  I then moved to Salt Lake City and the bread maker moved to a shelf in my parents basement.  FINALLY, one year over Christmas, I had the idea that the bread maker should be taken on the airplane as a carry on and moved to Salt Lake.  Why not, I could save $10 in shipping costs.  I convinced Ben, "Mr. I always think ahead," that people take large items all of the time as a carry on and I could do the same.  Well our ride drops us off at the airport and the lady behind the ticket counter would not allow me to proceed, saying it will cost me $50!  Ben gave me the "I told you so eyes," but knew it was a smart idea to keep all comments to himself.  Well, the bread maker made the journey and plopped out of luggage return and then sat once again in my Salt Lake pantry for another two years.  In fact, four weeks ago when I started using it, fumes from burnt plastic streamed out of the vents!  Ben swore he could taste plastic infused bread but I think he was just trying to get me going. :)

Trust me, it's a weird shift that first week. The loaf sat in fridge until at least Wednesday before one of us attempted to cut it. Before making the change, Ben even ate both end pieces of the last loaf of store bought bread, which NEVER happens. I remember gasping when Ben told me that he sliced two pieces of homemade bread for his sandwich. In fact he said he liked it.  It looks like it will be smooth sailing on our way to eating only homemade bread.

Measure out 2 bowls of dry ingredients so when the first loaf is done, you can toss in the second. Keep one in the fridge and freeze the second loaf for mid-week.  -amy w.

Honey Wheat Bread -  Modified from Toastmaster Recipe Book
1 egg, room temp plus enough warm water to equal 1 cup
2 TBL oil
3 TBL honey
1 1/2 tsp salt
1 cup whole wheat flour...Oooh yes, I grind mine!
2 cups bread flour
1 1/2 tsp Quick Rise Yeast
1 TBL Vital Wheat Gluten 

Tuesday, February 22, 2011

Pasta in the Making

Ever get the urge to make your own pasta?  If the Italian grannies can do it, so can you.  After receiving a KitchenAid pasta making attachment for Christmas, I decided to give this whole pasta thing a go! 

The first attempted dough recipe almost broke my mixer.  Let's just say, I had no idea what consistency of pasta dough was appropriate for the machine. After feeding the dough in, it became stuck in the attachment and I thought I was going to fry the motor. It made a low droning sound and I almost burnt my hand when I felt the top of the mixer . I panicked once I realized that I probably forgot to fill out the warranty and turned it off immediately.  I was pretty annoyed at this point, so I threw the clump of dough away. No pasta for dinner that night!

After a few more rounds of pasta dough and egg adjustments,  I figured out a recipe that has been working quite well.  I've used the pasta attachment to make angel hair, macaroni, and alfredo noodles.  The noodles are great, but I'm already over the fancy attachment. I was trying to figure out why I dislike the attachment and then I read this review on Amazon, which pretty much describes my experience perfectly. 

"The object is to continue to drop walnut-sized pieces of dough into the tube, while also catching the pasta as it comes out of the machine. Because it tends to get warm and stick together in one huge blob, people on the KitchenAid boards have suggested sprinkling the emerging pasta with flour. And for this, you need three hands. Those of us lucky enough to have been born with three arms may find it a breeze, but the rest of us will struggle. And this is not even to mention the additional mess (and wastage) of the sprinkled flour! By the time I was finished (or rather, surrendered), the place looked like an explosion in a flour mill!)."

From now on, I am sticking to the basics and using my rolling pin! (See discussion below for details) The grannies in Italy know best and they will tell you this! Good thing my grandma does not subscribe, I can already hear her telling me I should have used her recipe and directions.  :)

Whole Wheat Pasta
1 cup whole wheat flour
1 cup semolina flour
1 cup all-purpose flour
5 eggs + 1 egg yolk
1/2 teaspoon of baking powder

Mix on low speed with a dough hook for 5 minutes.  Add extra flour if the dough is too sticky (I had to add a few teaspoons).  Remove the dough from the mixer and knead by hand on a lightly floured surface for 4 minutes.  Wrap tightly in plastic wrap and allow the dough to relax in the fridge for 30-40 minutes.

Divide the dough into 3-4 sections, keeping the unused dough wrapped tightly in the fridge.  Roll the dough out thin, like a stick of gum.  Fold the dough in half and cut long strips.  Allow the cut pasta to dry for 45 minutes on a towel or thick string. 

Boil water, add salt, and cook for 5-10 minutes, until al dente. Due to the large amount of pasta created in one session, I've been freezing the dried out pasta and cooking from frozen.  -amy w.

Monday, September 20, 2010

Raspberry (Peach) Jam Cookies, pg. 284

I won't even try to beat Amy's thumbprint cookies with Homemade Jam!!...they look amazing!  It is ironic that we both picked this recipe in the same week without even knowing it. Great minds think alike ;)

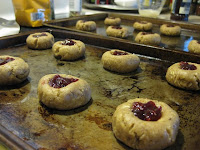
Raspberry Jam was my flavor of choice for me...I have a hard time straying from suggestion?!  The ingredients as a whole are very nutritious, they're like the ultimate fiber cookie.  The kids I cook for thought they were just OK, so perhaps they're not for everyone. But, Britt, an "official tester" gave them a delicious and ate 2 or 3...that's a win for me :) 

Now, I just spent 30 minutes trying to figure out how to upload more than 1 picture and how to keep the photo and next paragraph from running into one another and I can't do it.  Help?! So here the cookies are in raw form. Cookie Parade!
-Vicki ;)

My husband asked for seconds!  Yup, and the cookie didn't contain chocolate.  Lorna made these soft cookies using raspberry jam. I decided to switch the flavor and use my homemade peach preserves that I canned with the hybiscus peaches a few weeks ago.  Click on the highlighted link to view the recipe that I used: Recipe for Peach Preserves
This cookie tasted like I was eating a soft graham cracker with jam spread on top.  The dry ingredients were very unique; rolled oats + walnuts + cinnamon food processed with whole-wheat flour.   The dry ingredients combined with honey to sweeten gives this recipe a 5 grain rating!
Get excited, Vicki just got back from Spain!  I can't wait for her to post a blog or two about her travels.  -amy w.

Monday, September 6, 2010

Preserving Fresh Fruit/ Upside-Down Peach-Berry Cobbler, Pg. 291

Aren't they beautiful! The pink colored sauce is due to adding dried hibiscus. This is the second weekend in a row I've canned peaches.  Last Saturday, I decided to do a trial run to make sure everything turned out.  This past weekend, a good friend Tom from the yoga studio joined the fun. I strongly advise 2  people when canning. We canned preserves and peach halves in 3 hours.  Click on the following link to view the canning recipe -  Hybiscus Peaches

I baked Lorna's upside-down peach-berry cobbler. I had almost everything on hand except buttermilk and anise.  I made the buttermilk by adding a bit of vinegar to regular milk and I left out the anise. 

For the fruit mixture, peaches, mixed berries, peacns, brown sugar, cornstarch and freshly squeezed lemon juice were mixed together. 

The cake layer was a bit more interesting.  Whole wheat flour and cornmeal were the base mixed with the regulars.  This was a definately a new combination.  I liked the grainy stone-ground taste.  Peach season has arrived! 

-amy w.

Monday, July 12, 2010

My Latest Obsession......CrAcKeRs

This recipe is one you can whip up fast without making a trip to the grocery store.  I was inspired to make these crackers after buying a goat cheese spread with apricots and honey from the farmer's market.  Since Saturday, I've made this recipe twice.  The first time following the recipe as listed below and a second time, making adjustments to the bake time and pan type.

The 1st time I didn't roll the dough thin enough and I cooked them for 10 minutes then rotated the pan and cooked another 10 minutes, as stated by Peter.  The cooking time was too long.  On the 2nd try I rolled the dough much thinner and baked the crackers on  an air crisp pizza pan, removing them from the oven after 12 minutes.  The crackers did not burn or turn the rich brown. 

Only cook 1/2 the dough on your first try so you don't ruin the entire batch.  You can make adjustments as needed depending on your oven temperature and pan you are using.    

Thin Wheat Crackers
Taken from Whole Grain Breads - Peter Reinhart

1 cup whole wheat flour
1/2 teaspoon salt
6 tablespoons milk, buttermilk, yogurt, soy or rice milk
2 tablespoons honey
4 tablespoons vegetable oil or light olive oil
extra whole wheat flour for adjustments
1 tablespoon kosher salt or sea salt dissolved in 1/2 cup wather for salt water wash

1. Combine the 1 cup of flour and the salt, milk, honey, and oil in a bowl and mix to form a ball of dough.  Add extra flour or milk as needed to make a firm but tacky dough. 

2. Transfer the dough to a lightly floured surface and knead for 3 minutes, adjusting the flour or liquid as needed; the dough should feel like molding clay and have a satiny surface.  It should not be soft and sticky or crumbly.

3.  If baking the crakers immediately, preheat the oven to 350 degrees.  Cover the dough with a cloth or towel or plastic wrap and let rest for 20 minutes, then move on to the next step.  If holding the dough overnight, form it into a ball, place in a lightly oiled bowl, cover loosely with plastic wrap, and leave at room temperature overnight.

4. When you are ready to bake the crackers, prepare a sheet pan by lining it with parchment paper or a silicon mat.  Mist the work surface lightly with pan spray or wipe it with a touch of oil on a paper towel.  This makes it easier to lift the dough later.  Transfer the dough to the work surface and working from the center of the dough out to the four corners, roll it out into a rectangle, dusting the top of the dough with flour only if needed to prevent sticking.  Roll the dough out as thinly as it will allow, about 1/4 inch.  If the dough begins to spring back, let it rest for a few minutes, then continue rolling until the rectangle is about 1/8 inch thick.  Brush the top of the dough with the salt water wash.

5. Use a pizza roller or pastry scraper to cut the dough into whatever shapes (small rectangles are suggested).  Transfer the crackers to the prepared sheet pan.  The crackers should not touch.  Bake for 10 minutes, then rotate the pan 180 degrees and continue baking about 10 minutes longer, until the crackers begin to turn a rich brown on both the top and the underside.  (Waiting unil they turned a rich brown made them too burnt for my liking)

6. Let the crackers cool on the pan before serving.  They will crisp up as they cool.

Friday, July 2, 2010

Wheat Berry Salad with Apples and Mint...

Amy reviewed this recipe back in April which you can check out here.  She loved the recipe and Ben did too, so I'm sad to report I didn't feel the same way.  I am willing to try it again and here's why. My dressing was the whole problem. It didn't emulsify well, and stayed too runny. I used the mint I recently starting growing in my garden, but have only cooked with this one time. And, I didn't use fresh squeezed orange juice. So, I'm hoping the "medicinal" flavor I experienced was more a result of these errors than the actual recipe, because I really want to love it!  Here's hoping 2nd time around will be better, and I will surely let you know :)

Tonight I cooked up some Sweet Onion Risotto (using my first ever batch of homemade chicken stock!!!) and enjoyed it al fresco on our front porch with some Crispy Kale "chips"... my favorite way to chew on the curly, leafy greens.  I have yet to figure out the perfect cooking time and temp for the chips to come out crispy and yet not burned, but this will get you pretty close and it's so simple.  Preheat oven to 400 F, tear the leaves of your Kale into pieces, toss in olive oil & bake them on a sheet pan for about 6-8 minutes, then toss with a little salt or seasoning salt.  Enjoy! -Vicki

Saturday, June 19, 2010

Honey Whole Wheat/Spelt Pizza Dough

Kitchen gadgets...... people seem to have a love/hate relationship with them.  I LOVE my Kitchen Aid Mixer, Magic Bullet, Fagor Pressure Cooker, Stir Crazy Popcorn Maker, Presto Griddle, and Toastmaster Bread Machine. 

The "dough cycle" is what keeps me plugging in my bread maker time after time.  Since I'm continuously grinding wheat and spelt, homemade pizza dough is a must.  I double the recipe and freeze the dough into Ziploc bags.  Towards the end of a work week, I will thaw a pack of dough in my fridge and toss veggies, various cheeses, and leftover chicken/lunch meat onto the pizza that will not be used over the weekend.     

Honey Whole Wheat/Spelt Pizza Crust Dough -recipe has been modified Toastmaster Care Book
This recipe has been doubled.....prepare once eat twice!

2 cups warm water
4 TBL Oil
2 TBL Sugar
2 tsp. Salt
2 cups Whole Wheat Flour
3 cups Spelt Flour
3 tsp. Quick Rise Yeast
1 Scoop of Dough Enhancer and Vital Wheat Gluten
Drizzle honey over ingredients

1. Place ingredients into bread maker in the order listed.  Select the dough cycle and relax!  Since I'm not big into measuring ingredients, I usually keep a close eye on it at first to make sure the consistency looks correct. 

2. Divide the dough and freeze one or both servings.  If making a pizza, roll 1 section of the dough on a lightly floured surface.  Sprinkle the pizza stone with cornmeal and place dough on stone.  Prick dough with a fork.

3. Bake at 400 for 10-12 minutes until edges of the crust are golden brown.  Remove, add toppings and return to the oven for an additional 15-20 minutes.

Fav Tips:
1. No need to buy pizza sauce....I drain 1 can of diced tomatoes and blend in my Magic Bullet. 
2. Leftover cranberry goat cheese tastes AMAZING on pizza!
3. Garnish a thin crust pizza with radicchio lettuce coated in a light vinaigrette dressing
4. Season with fresh basil and parsley
5. Add barley, kamut, farro, or wheat berries...JK haven't tried this one yet!      

Sunday, February 21, 2010

Any-Grain and Honeyed Squash Casserole w/ Hazelnuts, Pg. 207

I usually don't get much of arm workout in the kitchen.  After grating 7 cups of butternut squash my bicept was feeling tired.

Squash Mix - butternut squash + honey + rosemary + dried currants + Marsala + salt + pepper

Topping - cooked grains (wheat berries) + honey + salt + butter + hazelnuts

Next time, I would consider cubing the squash rather than grating it.  I would cut back on the amount of rosemary.  This dish was rockin' a bit too much for my liking.  The casserole could be extremely interchangeble come Farmer's Market season.  Sweet potatoes, zuchinni, and egg plant would make excellent subsitutions.

Husband Rating: 2/5 Grains.  Not a huge squash fan!  - amy

Vicki's Version-With Buckwheat Grain Topping.
The combination of rosemary and butternut squash are delicious!  I was skeptical before making this dish, having most of my squash experience either roasted with butter and brown sugar or in pureed soup, I thought the suggested herbs would ruin the sweet flavor for me.  Completely the opposite happened.  This is one of those dishes that reminds me why I really need to start an herb garden, even if I only grow Rosemary.  I grows exceptionally well in Seattle's climate. There is nothing that compares to the fresh herb taste in a dish like this, so I guess Amy & I disagree a bit on that note :)  I didn't measure any of the ingredients, so I may have been a little light on the rosemary and heavy on the honey, but either way the combination with a little sherry vinegar is so sweet and savory.

I definitely missed the grated part when I prepped my squash earlier in the week.  I automatically cubed the squash without giving it a 2nd thought, assuming that's what the recipe called for, but when I opened up the recipe today (which I've previously read it at least 3 times!) I finally noticed the "grated" part. I thought for sure I had screwed up and this wouldn't turn out.  I added a little water, covered the baking dish well and cooked about 35 minutes total and it was perfect.  I used buckwheat for the topping along with the hazelnuts. I also added about a tablespoon of Onion Powder to the squash, which seemed to have added more depth of flavor so it wasn't all rosemary you tasted.  I will definitely be making this again, and perhaps even for school this week as a vegetarian dish.
Totally agree with Amy's additional veg options as well...I think this is more of a concept to have learned that I will be applying in more ways.
-Vicki

Tuesday, January 19, 2010

Creamy Wheat Berries with Honey, pg. 300

I forgot my grocery list in the car when I ran into Whole Foods...and yes, I could have gone out and grabbed it, but we were having one of those torrential downpours, and I figured I would wing it.  Somehow I forgot the recipe called for dried dates, and bought dried figs instead, but they worked!  Now I know I enjoy dried figs in hot grains, who knew!

I can't say this received amazing reviews.  My roommate Karen, who has a textural issue with creamy-like foods, told me she wouldn't even try it (only based on texture!) and Jeff took such a small bite I can't imagine he could taste much, but said it was good.  It's sweet and chewy, although I'm not sure it was actually cooked all the way and it's not very "creamy".  I enjoy the flavor, but want it a bit more cooked than the recipe called for.


Ironically, in my first attempt at cooking from the book, I have a dish with Milk as the first ingredient! I'm not tolerant of lactose, so I intend to cook through the book with as little dairy as possible.  This time I used rice milk instead (2 cups original, and 1 cup vanilla).  I imagine the fat content of rice milk vs. 2% is substantial enough to affect the creamy consistency of this dish, so I'm interested to see how Amy's real milk version will compare.  I also didn't top it with whipped cream, although it sounds delicious!  Overall I enjoyed the flavor of the finished product, but think I need to cook it more.  I'll be heating this up for breakfast in the morning.  A yummy start to a day all about food!   -Vicki


1/20/10

This recipe called for chopped dates. I thought a date was some sort of plum that was dried.  Ben said it was the root of a plant or vegetable.  We were both wrong!  "A date fruit is the product of a date palm, a tree native to Northern Africa and the Middle East, although it is also cultivated in other parts of the world. In addition to being eaten fresh, the date fruit is dried and eaten whole as a snack or included in an assortment of desserts." -wisegeek.com

I was pleasingly surpised at how this recipe turned out.  I cooked the wheat berries using my pressure cooker. Goodbye to soaking grains overnight!  Hooray for putting water, a tablespoon of oil, and berries in my Fagor pressure cooker for 35 minutes.  Next time, I may consider adding extra cinnamon and sugar into the water before cooking.  Is that allowed....or will I start a sugar stove fire?


After Ben's first bite, he said it tasted as if he was eating warm apple pie that was mixed with melted vanilla ice cream.  After a few chews, Ben said the flavor goes back to being a grain with the texture of corn.  He would prefer Craisins instead of  dates.  Husband Rating: 3.8/5 grains.

This recipe yields around 3-4 cups so be prepared for breakfast leftovers!  -amy