Saturday, April 30, 2011

Popcorn for the Sweet Tooth

CrUnChY caramel coated popcorn with a sprinkle of almonds.....delicious! But wait, the aroma of fresh popcorn popping and warm caramel simmering on your stove is another reason why you should prepare this delightful snack.


So what are you waiting for? Turn to page 286 in Lorna's book titled Popcorn-Almond-Caramel Balls. *sigh*, you don't have the book. Since I can't post all of her lovely recipes, click on the link - Caramel Corn and whip up a similar recipe.   -amy w.

Saturday, April 23, 2011

Balcony Garden Too, in the Midwest

I am once again a Midwest resident. After 5 years in Seattle I find myself back in the great state of Michigan. Two important guys in my life have brought me back, Dad and boyfriend, Scott. Leaving the ladies behind in Seattle was no easy task and the bf is really being supportive in making sure I'm enjoying things here. So this weekend we started a garden. Nothing big, just a couple of containers with some herbs and one small pot of peppers.  If we can manage this then maybe we'll go bigger next time?

We kept things simple, two long boxes that will hang over the balcony filled with parsley, basil, thyme, oregano and chives. As the engineer (or money manager?!) he's indicated that the "garden" in order to pay for itself, will have to yield more than $50 in produce this summer. Yikes! You need me to yield that much cash value in herbs and 1 pepper plant?! If that's not pressure, and challenge, to keep me watering the small things I don't know what would be! Bring it on. I'll be avoiding long viney things Amy did last year, hoping to retain space for BBQ patio dinners for two this summer :) So far he's into the challenge as well. Tonight after dinner he said, I'm gonna water the kiddos! and happily refers to the pepper plant as his baby. Well, OK then. Together we'll keep these things alive. Hopefully we'll get some sprouts soon as we're little bit late planting our seedlings.


Here they are in the kitchen while we wait out the fear of possible frost.
Happy Gardening and Happy Easter! -Vicki

Monday, April 18, 2011

Balcony Gardening - Round Two


Another year, another garden! I've decided to try flower boxes, which I can hang on the railing instead of using white 5 gallon pails.  I plan to have three boxes containing plant herbs, lettuce, and strawberries. 

Earlier this month, Ben told me he did not want the pails taking up space on our tiny patio.  Little did he know that I had a plan to hang everything and continue on my merry gardening way. I think while he is away at a conference in 2 weeks, I will just plant a few of the pails anyhow.  I'll make sure to refrain from the pumpkin and zuchinni plants that took over our entire patio last year. 

Visit one of my favorite blogs Life on the Balcony for helpful information, video tutorials, and crafty projects. Not in the mood to read a blog,  pick up Amy Pennington's book titled Apartment Gardening.  "Grow squash on your patio, flowers in your window box, and pick blackberries from your parking strip". 

Start your garden, we'll talk grains shortly! - amy w

Tuesday, April 12, 2011

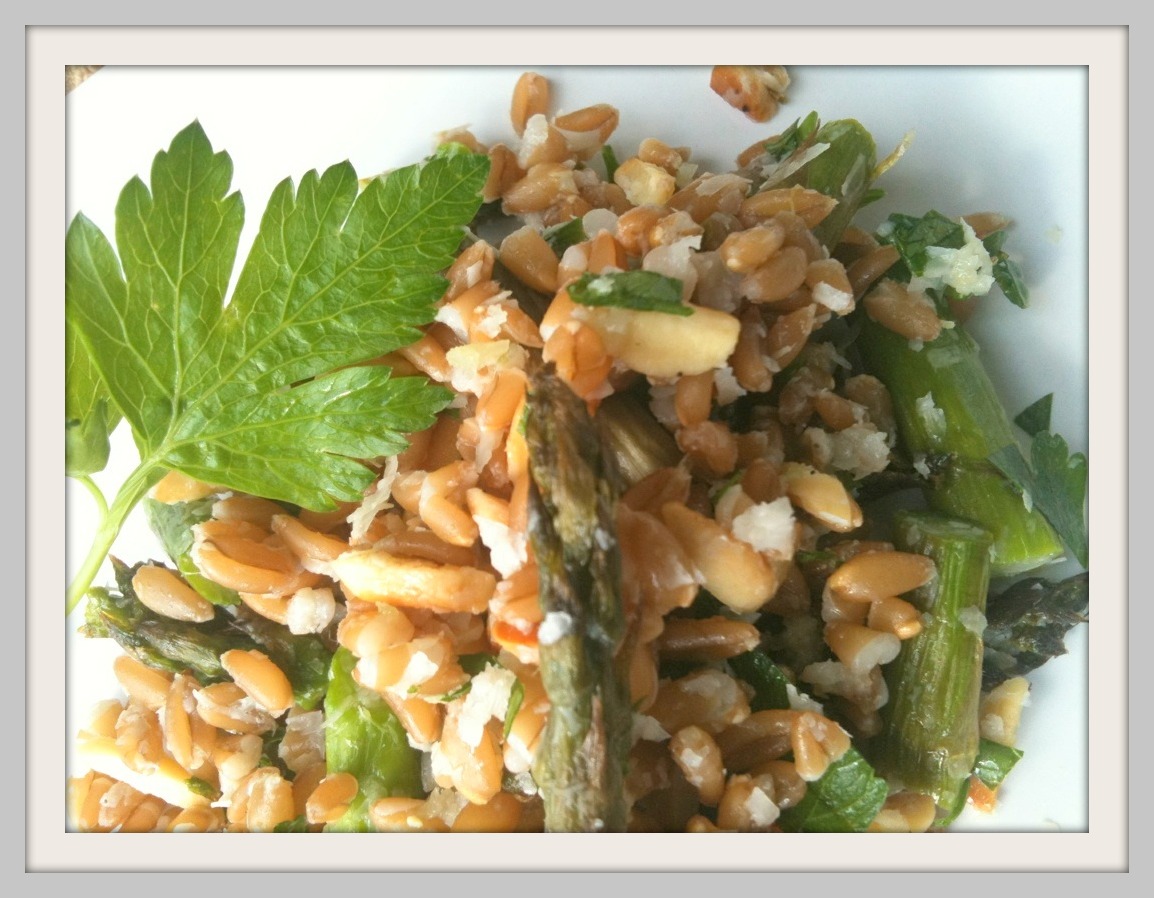
Farro & Roasted Asparagus Salad


You know you need to bring that Easter dish to Aunt Sally's gathering.  Skip the marshmallow jello, condensed chicken soup casserole, and Velveeta cheesy potatoes.  Instead, bring a fresh wholesome dish bursting with spring flavor.

Farro & Roasted Asparagus Salad -modified from Mike Roberts
1 pound asparagus
6 tablespoons olive oil, divided
2 teaspoons salt, divided
1 1/2 cups cooked farro
5 tablespoons slivered almonds
2 medium garlic clove - pressed
1/4 cup minced fresh parsley
1/2 cup finely grated Parmesan cheese
4 tablespoons lemon juice
Freshly ground black pepper to taste

Rinse asparagus and pat dry.  Lay out a single layer in a baking pan and drizzle with 2 tablespoons olive oil.  Sprinkle with 1 teaspoon salt and 2 garlic cloves pressed.  Roast in a preheated 450 degree oven 10-12 minutes, until the asparagus is tender.

Cool and cut into 1/2-inch pieces on a diagonal.

Cook farro in a pot large and put about two to two and a half cups of salted water per every cup of farro. Bring to a boil. Reduce to a simmer with a closed lid for 20 to 40 minutes. Drain and rinse with cold water.

Toast almonds in a small dry skillet until golden.

Combine the asparagus, farro, the remaining 3 tablespoons of olive oil, 1 teaspoon salt, the nuts, parsley, and Parmesan.  Cover and refrigerate.

One hour before serving bring the salad to room temperature.  Just before serving, stir in the lemon juice and pepper.    -amy w.

Tuesday, April 5, 2011

Bread Prices on the Rise

I can't complain about gas prices since I commute 3 miles to work.  If traffic lights are working in my favor, I can leave 10 minutes before works starts and stroll into the office with plenty of time. However, it looks like gas prices are really beginning to effect food prices, so, the Whipple household is taking action one step at a time!  Several weeks ago, I told Ben that bread making will now be on the weekend chore list....well, my chore list! I think his list may be a bit longer than mine already, so I'm OK with adding one.  It's been 3 weeks now and there is no going back!
This week, I encourage you to bust out your bread machine and put it to work.  Back in 2001, during my college years, my mom thought it would be a genius idea to buy me a bread maker.  It sat on the shelf.  I then moved to Salt Lake City and the bread maker moved to a shelf in my parents basement.  FINALLY, one year over Christmas, I had the idea that the bread maker should be taken on the airplane as a carry on and moved to Salt Lake.  Why not, I could save $10 in shipping costs.  I convinced Ben, "Mr. I always think ahead," that people take large items all of the time as a carry on and I could do the same.  Well our ride drops us off at the airport and the lady behind the ticket counter would not allow me to proceed, saying it will cost me $50!  Ben gave me the "I told you so eyes," but knew it was a smart idea to keep all comments to himself.  Well, the bread maker made the journey and plopped out of luggage return and then sat once again in my Salt Lake pantry for another two years.  In fact, four weeks ago when I started using it, fumes from burnt plastic streamed out of the vents!  Ben swore he could taste plastic infused bread but I think he was just trying to get me going. :)

Trust me, it's a weird shift that first week. The loaf sat in fridge until at least Wednesday before one of us attempted to cut it. Before making the change, Ben even ate both end pieces of the last loaf of store bought bread, which NEVER happens. I remember gasping when Ben told me that he sliced two pieces of homemade bread for his sandwich. In fact he said he liked it.  It looks like it will be smooth sailing on our way to eating only homemade bread.

Measure out 2 bowls of dry ingredients so when the first loaf is done, you can toss in the second. Keep one in the fridge and freeze the second loaf for mid-week.  -amy w.

Honey Wheat Bread -  Modified from Toastmaster Recipe Book
1 egg, room temp plus enough warm water to equal 1 cup
2 TBL oil
3 TBL honey
1 1/2 tsp salt
1 cup whole wheat flour...Oooh yes, I grind mine!
2 cups bread flour
1 1/2 tsp Quick Rise Yeast
1 TBL Vital Wheat Gluten 

Tuesday, February 22, 2011

Pasta in the Making

Ever get the urge to make your own pasta?  If the Italian grannies can do it, so can you.  After receiving a KitchenAid pasta making attachment for Christmas, I decided to give this whole pasta thing a go! 

The first attempted dough recipe almost broke my mixer.  Let's just say, I had no idea what consistency of pasta dough was appropriate for the machine. After feeding the dough in, it became stuck in the attachment and I thought I was going to fry the motor. It made a low droning sound and I almost burnt my hand when I felt the top of the mixer . I panicked once I realized that I probably forgot to fill out the warranty and turned it off immediately.  I was pretty annoyed at this point, so I threw the clump of dough away. No pasta for dinner that night!

After a few more rounds of pasta dough and egg adjustments,  I figured out a recipe that has been working quite well.  I've used the pasta attachment to make angel hair, macaroni, and alfredo noodles.  The noodles are great, but I'm already over the fancy attachment. I was trying to figure out why I dislike the attachment and then I read this review on Amazon, which pretty much describes my experience perfectly. 

"The object is to continue to drop walnut-sized pieces of dough into the tube, while also catching the pasta as it comes out of the machine. Because it tends to get warm and stick together in one huge blob, people on the KitchenAid boards have suggested sprinkling the emerging pasta with flour. And for this, you need three hands. Those of us lucky enough to have been born with three arms may find it a breeze, but the rest of us will struggle. And this is not even to mention the additional mess (and wastage) of the sprinkled flour! By the time I was finished (or rather, surrendered), the place looked like an explosion in a flour mill!)."

From now on, I am sticking to the basics and using my rolling pin! (See discussion below for details) The grannies in Italy know best and they will tell you this! Good thing my grandma does not subscribe, I can already hear her telling me I should have used her recipe and directions.  :)

Whole Wheat Pasta
1 cup whole wheat flour
1 cup semolina flour
1 cup all-purpose flour
5 eggs + 1 egg yolk
1/2 teaspoon of baking powder

Mix on low speed with a dough hook for 5 minutes.  Add extra flour if the dough is too sticky (I had to add a few teaspoons).  Remove the dough from the mixer and knead by hand on a lightly floured surface for 4 minutes.  Wrap tightly in plastic wrap and allow the dough to relax in the fridge for 30-40 minutes.

Divide the dough into 3-4 sections, keeping the unused dough wrapped tightly in the fridge.  Roll the dough out thin, like a stick of gum.  Fold the dough in half and cut long strips.  Allow the cut pasta to dry for 45 minutes on a towel or thick string. 

Boil water, add salt, and cook for 5-10 minutes, until al dente. Due to the large amount of pasta created in one session, I've been freezing the dried out pasta and cooking from frozen.  -amy w.

Tuesday, February 8, 2011

Salmon-Quinoa Baby Cakes

Could there be a more healthful recipe title than this?  Wild caught Alaskan salmon with its super high content of healthy fats, paired up with complete protein grain quinoa. Amazing!  At least that is what I'm hoping for. As I'm nearing the date to my final menu project for school I've been practicing this one quite a bit.  It's a recipe I adapted into a delicious starter course on my menu.  It will be served very similar to the photo except on a bed of mache (recently discovered favorite lettuce!) with a mustard aioli.

The process is pretty simple: Cooked quinoa and diced, sauteed vegetables (carrot, celery, onion), with small diced salmon.  Blend a bit of your quinoa and salmon in a food processor with the egg to get a gluten free binder too! I added tarragon and parsley to my version of these cakes and really love the flavor paired with mustard aioli.  I found forming the cakes in a mini muffin pan helped keep the cakes together. They are first baked in the oven and then removed and quickly pan fried in order to get a slightly crispy crust.  There is no real recipe here...try mixing cooked quinoa with various other mix-ins and herbs for a tasty starch side, very high in protein.

I hope you give them a try and enjoy!  -Vicki

Tuesday, February 1, 2011

Breakfast "On the Go"

I'm up everyday at 5:40 and out the door by 6:40.  By the time I pack my lunch, grab yoga clothes, and make a fruit protien shake for mid-morning, I'm left searching for what I can eat in under 5 minutes.
The past two weeks have been a breeze.  Lorna's 5-minute steel-cut oats with gingered fruit compote on page 247 was exactly what I needed.  In her introduction to the recipe, she explained how everything could be prepared in advance.  On Sunday night, I brought 4 cups of water and a dash of salt to a boil.  I stirred in the cup of steel cut oats and cinammon.  After everything was combined, I placed the lid back on and turned off the heat.  The pan was left out on the stove overnight and I woke up the next morning to breakfast for the entire week.  It took me 10 minutes from start to finish by the time I heated the oats back up, stirred in milk and divided everything into small containers.  I can't wait to add fresh peaches and cherries from the Farmer's Market!

Inspired by the 5 minute prep time, I took steel cut oats to the next level and found an oatmeal/fruit bar recipe (pictured above).  Once again I prepared everything on Sunday night, cut and wrapped the bars so I was ready for the week. I even had extra to freeze. This recipe can be found on one of my favorite blog sites, Nourished Kitchen.  Enjoy!  -amy w.   

Sunday, January 9, 2011

Oat & Turkey Soup with Tex-Mex Flavors, pg. 126/ Split Pea Soup

Soup season is in full force.  I can't think of a better way to enjoy my Sunday evening after skiing than kicking up my feet while watching Netflicks with a big bowl of soup on my lap.  I usually only cook slow cooker soups.  Recipes that I can toss together all at once and come back several hours later to a soup that is ready to eat.  I'm not one to stir a big pot over the stove continuing to add ingredients.  Lorna's soup was not made in the slow cooker, but rather one I could toss together fairly fast and then freeze extra for an upcoming Sunday.
I started this soup in a large pot and cooked the onion and celery.  I then added the cans of diced tomatoes with green chiles along with several seasonings including cinammon. Once I could smell the spices, I poured the water in the pot along with the 3 chicken thighs.  The turkey simmered, and the oats cooked.  As usual, I never follow the full directions so I added several items in my fridge.  For this soup, I added leftover kamut, butternut squash, fresh cilantro and parsley.  The Tex-Mex flavors came together nicelly and I will for sure be making this in the future. 
While skiing last weekend, my friend Jackie had the pefect idea, soup bowls in the "brown bag" lunch area.  Enjoy.    
Split Pea Soup w/Couscous
Modified from Fix-It and Forget-It
1 lb. pkg. split peas
6 slices of thick ham
2 carrots, diced
1 onion, diced
1 rib celery, diced
4 potatoes, diced
1 qt. water
1 qt. chicken broth
Seasoning (pepper, bay leaf, allspice, sugar)
1 cup couscous, cooked (add to soup before serving)

Directions: Wash and sort split peas, removing any stones.  Combine all ingredients except cooked couscous in the slow cooker.  Cover in slow cooker. Cook on low 8-10 hours.  Add couscous to soup before serving.   -amy   

Tuesday, November 30, 2010

The Whipple in Me

I feel like everyone should visit the Whipple household (Ben's Mom's house).  It's like stepping into Willy Wonka's house.  Three kinds of Kool Aid in the fridge, two flavors of ice cream, and candy dishes around the house filled with chocolate.  I can't control myself in this type of enviroment.  You think with a name like "Grain Girls", I could help myself.

The holiday is just around the corner and I have to make sure Ben and I don't resort back to old habits.  One of my resolutions is to "healthify" old recipes.  My husband has come a long way and everyone knows this hasn't been an easy task! He's eating kamut, spinach salad, and homemade soy/yogurt ice cream. I feed him so many different types of squash that he's now a fan.  Last time I checked, he could name 9 grains!  Impressive. 

Today, I felt it necessary to post one of my not so heathy recipes, however it still contains grains. Lorna would never approve this recipe but as I stated in the above paragraph, my plan is to revamp it in 2011.  When I make this recipe, I can't believe I add a full stick of butter and 1 can of sweetened condensed milk.  Who puts this in a recipe?  GUILTY...right here! Apparenlty, I still have a little Whipple in me!    

Fudgy Bars - Modified from Meals for Month, by Linda Larsen
2 cups chocolate chips
3 tablespoons butter
1 14oz can of sweetened condensed milk
2 cups whole wheat flour
2 cups oats
1 1/2 cups brown sugar
1 teaspoon baking soda
1/4 teaspoon salt
1 cup butter, melted
1 cup chopped walnuts

1. Preheat oven to 350.  In a microwavable bowl, combine chocolate, 3 tablespoons butter, and sweetened condensed milk.  Heat for 2-3 minutes until melted.

2. In a bowl combine flour, oats, brown sugar, baking soda, and salt.  Pour melted butter over and mix until crumbs form.  Stir in walnuts. Press 1/2 of the crumb mixture in a 13"x9" pan.  Pour chocolate mixture over crust.  Sprinkle remaining crumb mixture over chocolate.

3. Bake at 350 for 25-25 minutes.  Let cool, cut bars, and enjoy!  I like to individually wrap and freeze.

Stay tuned  for the 2012 fudgy bar healthy remix recipe.  -amy w.

Monday, November 15, 2010

Don't Forget to Toast Your Oats - Oatmeal Raisin Cookies, Pg. 282

Show of hands to those who toast their oats when making oatmeal cookies?  I had to reread the recipe to make sure I was following directions.  Surely it read, " Spread oats out and bake at 400 on the bottom rack for 3 minutes, stir, and continue baking until lightly toasted, 1 to 2 minutes."  You know what to do the next time you make oatmeal cookies! 

Why I LOVE Oatmeal Cookies
1. Spelt flour + oats = TWO grains in one recipe
2. Ben likes anything with the word cookie in it
3. Yellow raisins count as a serving of fruit
4. Toasting your oats brings out the oat-i-ness


A must read for the month of November!

"Will Write for Food is for food lovers who want to express themselves, guiding them from their earliest creative impulses to successful article writing, restaurant reviewing, and cookbook writing. Dianne Jacob—journalist and food-writing instructor and coach—offers interviews with award-winning writers such as Jeffrey Steingarten, Calvin Trillin, Molly O'Neill, and Deborah Madison, plus well-known book and magazine editors and literary agents, give readers the tools to get started and the confidence to follow through." -www.goodreads.com 


Sunday, November 7, 2010

Facebook Fan Page

I'm not sure if we consider ourselves a company, BUT as you know we are owners of the domain graingirls.com and NOW you can join us on Facebook!  Grain Girls

Millet + spelt + quinoa + barley, you name it, we are cooking with it, or at least trying!

If you have never given grains a chance, we hope to inspire your taste buds and invite them into your home.  If you hate grains and everything about their taste, texture, and appearance, it's time to get your grain on! We are here to help! Join us on Facebook for fun updates about what inspires us and keeps us cooking grains. 
amy w.

Saturday, October 30, 2010

Early Morning Grains

I have been eating unique varieties of grains now for nearly 6 years! I can hardly remember a time when I didn't have a pantry full of bulgur, millet, quinoa, amaranth and 5 kinds of rice.  Yet I still have moments when I eat plain, lightly-salted grains for breakfast.  I generally start my day fairly early, but try not to leave the house with a healthy hot breakfast in hand.  I am the girl with the "crazy grains" as some of my classmates would say, and it feels odd to have anything else for breakfast (OK, bacon is always an acceptable substitution!).  But, it can be hard to be creative at 5:30 am, and if I did not prep the earlier in the week, salted bulgur with nothing else will be my morning meal along with my 12 ounces of french press coffee.

This week however, was a strong one, a moment of hope in a gray grain world.  On Monday, my weekly prep day, I cooked a few cups of barley from Finn River Farms. For three days, I reheated the barley with roasted acorn squash (cooked with a sauce of butter, brown sugar and orange juice) for a delicious treat. It was fantastic! Of course then the end of the week hit, I was tired and sick of repetition and resorted to plain old quinoa this morning, not bad in my eyes, but not terribly exciting for a culinary student to be cooking up!

I love pairing my breakfast grains with veggies, something I picked up on a detox diet when I was first introduced to the world of whole grain goodness. This meal planning habit is now second nature to my AM food ritual. When I allow time to actually make something tasty, these are some of my favorite combinations:
Quinoa with Broccoli or Peas
Barley & Acorn Squash (new favorite!)
Amaranth & Zucchini
Corn Grits & Sweet Potatoes (this one was a Karen invention and I love it...and she does a better job than me too!)
Buckwheat & Peas
Millet and Steamed Carrots

The list goes on and on. Fresh herbs & Homemade Seasoning salt (Yum!) add another flavor dimension to experiment with.  Keeping prepped grains, along with frozen and/or pre-roasted veggie options will help you toss together a quick and nutritious breakfast. Even if you're barely awake, the sun hasn't rose and you're tiptoeing around the house, so as not to wake the still sleeping roommates...my daily routine ;)
OK, I've actually made several dishes from the grain book lately too, so more to come!  The kids loved the Kibbeh too, so I'll be making that again.
-Vicki

Saturday, October 23, 2010

Popcorn-Crusted Fish, Pg. 174

Vicki and I have great chats about our weekly cooking adventures.  The conversation usually end how we wish we could be more like the other.  Vicki can be described as the A+ chef.  Instead of barely reading a recipe, Vicki reads it three times.  If a recipe calls for an exotic spice, she refuses to skimp. Vegetables are cut perfect, presentation is everything, serving dishes are used and garnishes are added. Vicki goes all 9 yards.  Her recipe looks like the magazine example.  I, on the other hand, tend to be the unpredictable cook.  I barely read the entire recipe, add three spices in substitution instead of buying a new spice, my vegetables are cut to various sizes, and additional strange ingredients are added.  My finished product looks nothing like the published picture. My husband is asking, "What did you make?"

Let me explain why I needed more "Vicki" in me this week.  I decided to make the popcorn-crusted tilapia from Lorna's book.  I already freak out every time I make fish due to it turning about bad. My husband insists he's not a huge fan, I insist he is!  Popcorn fish sounded like the perfect dinner.

The recipe called for 2 cups of "POPPED" popcorn, flour, and spices.  Here's where the #1 Vicki rule comes into place....read the recipe again.  I GROUND whole popcorn kernels in my Magic Bullet.  What the heck was I thinking?  I battered the fish in hard kernels and proceeded to then brown the fish.  The kitchen started stinking like burnt popcorn, the coating turned black, my fish was still raw, and small pieces of popcorn were popping everywhere.  At this point, I panicked and put on my safety goggles (jk).  Not once did I think to reread the recipe, I just kept on cooking.  Finally I had blackened fish with a gravel-like texture, all fans in the kitchen were on high, and bits of popcorn pieces covered my stove.

 "Shoot, I ruined another fish night!"  I resorted to the taco fish idea and scraped some of the kernel crust to dispose of the burnt evidence.  I layered small pieces of fish on the bottom of a tortilla and turned to my fridge to add every taco-like ingredient I could find on top.  Ben's seemed to not notice, and recipe was completely edible.  (For viewers sake, no pictures will be shown.) Vicki, I can't wait for you to cook this recipe the correct way!!

For a fast snack Ben and I enjoy popcorn in the Stir Crazy Popcorn Popper  with lime and salt or fresh popcorn with nutritional yeast and salt.  Enjoy.  -amy w.

Saturday, October 9, 2010

The Garden of Greatness - Amy's Organic Garden (AOG)

I started a garden on our patio back in May.  After talking this through with Ben, he was pretty convinced it was not one of my best ideas.  I'm the type of person that will start something without thinking about the entire process.  My husband on the other hand addressed several questions, but will support my decision either way.
"Amy, I'm really busy with school and I don't want this to become one of those WE projects."  No worries, I've read a few people's blogs on container gardening.  I know exactly what I need to do.  Shortly after, Ben is drilling holes in buckets, carring large bags of dirt to the patio, and helping me dump soil into the buckets.  WE started a garden together!!!  

"Amy, maybe you should wait a few weeks to start your garden.  It's still pretty cold at night." Naaa, I think the weather is fine, besides it's starting to warm up.  After planting all of the containers, I realize it's a bit early.  My nightly routine consisted of hauling 7 containers into the living room, telling Ben that I need help because the tomato pot is too heavy. 


Amy, I would still like to be able to grill and put our table and chairs out like we did last year.  Yeah, we'll have plenty of room.  Note to self, if you plant pumpkins and zuchinni on your patio, vines will be everywhere. Welcome to our patio pumpkin patch and watch out for the crazy tomato plants.  October 9th, our table and chairs are still in the storage unit.


For the past 5 months, I've watered, our garden. Every morning, I make three trips with the watering can from my sink to the patio.  Here's the output:

Strawberries -15 berries
Lettuce - 4 servings
Spinach - 4 servings
Basil, parsley, and cilantro - plentiful
Cucumbers - 5
Zuchinni - 0
Pumpkins - 2 (fist size)
Cherry Tomatoes - Maybe 7 tiny tomatoes
Regular Tomatoes - 4

Next year, I should stick to herbs and cucumbers.  I also need to read on how to properly grow tomatoes.  As you can see by the pictures, we had a tomato jungle on our porch.  How did my plants not produce tomatoes?  I guess we will see what next year brings!!  - amy w.